本文最后更新于 2025年1月18日 凌晨
前言
本文记录个人学习 OOP 编程时的笔记,编程语言为 C++11,参考科学出版社的《C++面向对象程序设计》 。后续会在此基础之上不断补充 OOP 编程的设计理念与编程范式。不同的语言可能会有一些语法上的出入,但是 OOP 的核心思想是一致的,那就是封装、继承和多态。
为了应试,我详细分析了学院历年的考试题目,内容托管在 CSDN 网站上:
1 封装
以封装二叉搜索树 (Binary Search Tree, 简称 BST) 为例讲解 C++ 中 OOP 编程时封装的规范。
1
2
3
4
5
6
7
8
9
10
11
12
13
14
15
16
17
18
19
20
21
22
23
24
25
26
27
28
29
30
31
32
33
34
35
36
37
38
39
40
41
42
43
44
45
46
47
48
49
50
51
52
53
54
55
56
57
58
59
60
61
62
| #include <iostream>
using namespace std;
struct Node {
int val;
Node* left;
Node* right;
Node(int _val) : val(_val), left(nullptr), right(nullptr) {}
};
class BinarySearchTree {
private:
Node* root;
Node* Insert(Node* now, int x) {
if (now == nullptr)
now = new Node(x);
else if (x < now->val)
now->left = Insert(now->left, x);
else
now->right = Insert(now->right, x);
return now;
}
void Output(Node* now) {
if (now == nullptr) return;
Output(now->left);
cout << now->val << ' ';
Output(now->right);
}
public:
BinarySearchTree() : root(nullptr) {}
void Insert(int x) {
root = Insert(root, x);
}
void Output() {
Output(root);
}
};
int main() {
BinarySearchTree Tree;
int a[] = {3, 2, 4, 1, 5, 7, 9, 6, 8}, n = 9;
for (int i = 0; i < n; i++) {
Tree.Insert(a[i]);
}
Tree.Output();
return 0;
}
|
1
2
3
4
5
6
7
8
9
10
11
12
13
14
15
16
17
18
19
20
21
22
23
24
25
26
27
28
29
30
31
32
33
34
35
36
37
38
39
40
41
42
43
44
45
46
47
48
49
50
51
52
53
54
55
56
57
58
59
60
61
62
63
64
65
66
67
68
69
70
| #include <iostream>
using namespace std;
struct Node {
int val;
Node* left;
Node* right;
Node(int _val) : val(_val), left(nullptr), right(nullptr) {}
};
class BinarySearchTree {
private:
Node* root;
void Output(Node* node) {
if (node == nullptr) return;
Output(node->left);
cout << node->val << ' ';
Output(node->right);
}
public:
BinarySearchTree() : root(nullptr) {}
void Insert(int x) {
if (root == nullptr) {
root = new Node(x);
return;
}
Node* cur = root;
while (true) {
if (x == cur->val) break;
else if (x < cur->val) {
if (cur->left == nullptr) {
cur->left = new Node(x);
break;
}
cur = cur->left;
} else {
if (cur->right == nullptr) {
cur->right = new Node(x);
break;
}
cur = cur->right;
}
}
}
void Output() {
Output(root);
}
};
int main() {
BinarySearchTree Tree;
int a[] = {3, 2, 4, 1, 5, 7, 9, 6, 8}, n = 9;
for (int i = 0; i < n; i++) {
Tree.Insert(a[i]);
}
Tree.Output();
return 0;
}
|
参考:
关于二叉树。先贴上这一篇对我影响颇深的博客,没有他我怎么都想不明白二叉树的三种递归遍历方式:数据结构——二叉树先序、中序、后序及层次四种遍历(C 语言版)
关于递归。由于二叉树的构建其中一种涉及到了递归建树,我再贴一篇博客,以此记录这篇博客对我 递归 理解的启发与深远影响:100 天精通 Python(基础篇)——第 10 天:函数进阶
关于平衡二叉搜索树 (Balanced Binary Tree, 简称 AVL)。当插入二叉搜索树的数据是单调的时候,二叉树会退化成一条链,此时对其进行的各种操作都会从 O(logn) 退化为 O(n),而 AVL 树可以很好的解决这个问题。
2 继承
继承的本质是为了代码复用。在不同的应用场景下,我们可以通过类的继承实现成员函数的扩展与重载,从而达到一码多用的效果。
2.1 最简单的生死
1
2
3
4
5
6
7
8
9
10
11
12
13
14
15
16
17
18
19
20
21
22
23
24
25
26
27
28
29
30
31
32
33
| #include <iostream>
using namespace std;
class A {
private:
int x;
public:
A(int x = 0) : x(x) {
cout << x << endl;
}
virtual ~A() {
cout << -x << endl;
}
};
class AA : public A {
private:
int xx;
public:
AA(int x, int xx) : A(x), xx(xx) {
cout << xx << endl;
}
~AA() {
cout << -xx << endl;
}
};
int main() {
AA a1(3, 4);
AA a2(2, 5);
return 0;
}
|
- 列表化初始化的时候感觉和 父类这个对象是当前子类的成员变量 一样
- 析构顺序为:父生,子生,子死,父死
2.2 动态申请空间的生死
类与上述一致
1
2
3
4
5
6
7
| int main() {
A* a = new A(2);
AA* aa = new AA(3, 4);
delete a;
delete aa;
return 0;
}
|
- 这没啥好说的想谁生就生,想谁析构就让谁析构
- 父类的使用与平常一致,没有影响
- 有一个好玩的地方就是关于析构函数中
virtual 关键字是否使用的问题。如果当前类可继承,并且确实被继承了,那么它的析构函数就一定要加 virtual 关键字,这样才能确保内存释放干净
- 可以将基类与派生类之间的继承关系理解为一棵多叉树,其中最开始被继承的基类为根节点。例如:利用一个
A 类的指针创建一个 B 类的对象 A* ptr = new B,那么
- 构造过程:从 A 结点开始走一个简单路径到 B 并依次执行构造函数。
- 析构过程:从 B 结点开始走一个简单路径到 A 并依次执行析构函数。
2.3 继承中的 protectd 权限
1
2
3
4
5
6
7
8
9
10
11
12
13
14
15
16
17
18
19
20
21
22
23
24
25
26
27
28
29
30
31
32
33
34
35
36
37
38
39
40
41
| #include<iostream>
using namespace std;
class A {
private:
int x1;
public:
int x2;
protected:
int x3;
public:
A(int x1, int x2, int x3) : x1(x1), x2(x2), x3(x3) {
cout << x1 << " " << x2 << " " << x3 << endl;
}
virtual ~A() {
cout << -x1 << " " << -x2 << " " << -x3 << endl;
}
};
class AA : public A {
int xx;
public:
AA(int x1, int x2, int x3, int xx) : A(x1, x2, x3), xx(xx) {
cout << x1 << " " << x2 << " " << x3 << " " << xx << endl;
}
~AA() {
cout << -x2 << " " << -x3 << " " << -xx << endl;
}
};
int main() {
A* p1 = new A(1, 2, 3);
delete p1;
AA* p2 = new AA(4, 5, 6, 7);
delete p2;
return 0;
}
|
1
2
3
4
5
6
7
| 输出:
1 2 3
-1 -2 -3
4 5 6
4 5 6 7
-5 -6 -7
-4 -5 -6
|
protected 的数据成员只可以在这个类的派生类中使用,其他地方都不可以调用- 基类的
private 数据成员只可以在这个类中使用,其他地方包括它的派生类都不可以访问
2.4 三种继承方式
- 公有继承:就是没有调用权限的约束,任意子类均可使用其父类封装的方法。这也是工程上主要使用的继承方式。
- 私有继承:将基类
A 的公有与保护的成员全部作为自己的私有成员继承下来了,因此当前类 B 不能访问到基类 A 的 public 成员。与此同时,若当前派生类 B 作为其他类 C 的基类,则 C 类不能访问 A 中的 public 和 protected 成员。
- 保护继承:将基类
A 的公有与保护的成员全部作为自己的保护成员继承下来了,因此同样的当前类 B 不能访问到基类 A 的 public 成员。与此同时,若当前派生类 B 作为其他类 C 的基类,则 C 类能够以 protected 的形式访问 A 中的 public 和 protected 成员。
2.5 修改某些继承成员的继承类型
只是在派生类中对继承下来的成员进行了继承方式的修改,并不影响基类中成员本身的权限属性。
举个例子:
1
2
3
4
5
6
7
8
9
10
11
12
13
14
15
16
17
18
19
20
21
22
23
24
25
26
27
28
29
30
31
32
33
34
35
36
37
38
39
40
41
42
| #include <iostream>
using namespace std;
class A {
private:
protected:
public:
void f1() {
cout << "私有继承后,外界无法访问到基类中的公有成员了" << "\n";
}
void f2() {
cout << "私有继承后,我让 f2 函数变为外界可访问" << "\n";
}
void f3() {
cout << "私有继承后,我让 f3 函数变为外界可访问" << "\n";
}
void f3(int) {
cout << "私有继承后,我让 f3 重载函数通过一句话也变为外界可访问" << "\n";
}
};
class B : A {
private:
protected:
public:
using A::f2;
using A::f3;
};
int main() {
B object;
object.f2();
object.f3();
object.f3(1);
return 0;
}
|
2.6 多级派生
没什么好多说的,上代码!代码看懂了,输出结果看懂了,就 OK 了。唯一需要强调的一点是:在多级派生时,对于一个派生类对象的初始化,一定要附带着把他所有的“爹”也全部初始化,否则调用默认构造函数初始化他的所有“爹”。
1
2
3
4
5
6
7
8
9
10
11
12
13
14
15
16
17
18
19
20
21
22
23
24
25
26
27
28
29
30
31
32
33
34
35
36
37
38
39
40
41
42
43
44
45
46
47
48
49
50
51
52
53
54
55
56
57
58
59
60
61
62
63
64
65
| #include <iostream>
#include <string>
using namespace std;
class A {
protected:
int id;
string name;
public:
A(int id = 0, string name = "hehe") : id(id), name(name) {
cout << "基类A被创建" << endl;
}
~A() {
cout << "基类A被销毁" << endl;
}
int get_id() { return id; }
string get_name() { return name; }
void show_A() {
cout << "id: " << "\t" << get_id() << endl;
cout << "name: " << "\t" << get_name() << endl;
}
};
class B : public A {
protected:
double score;
public:
B(int id = 0, string name = "hehe", double score = 99.5)
: A(id, name), score(score) {
cout << "直接派生类B被创建" << endl;
}
virtual ~B() {
cout << "直接派生类B被销毁" << endl;
}
double get_score() { return score; }
void show_B() {
show_A();
cout << "score: " << "\t" << get_score() << endl;
}
};
class C : public B {
protected:
int age;
public:
C(int id = 0, string name = "hehe", double score = 99.5, int age = 18)
: B(id, name, score), age(age) {
cout << "间接派生类C被创建" << endl;
}
virtual ~C() {
cout << "间接派生类C被销毁" << endl;
}
int get_age() { return age; }
void show_C() {
show_B();
cout << "age: " << "\t" << get_age() << endl;
}
};
int main() {
C obj(1, "dwj", 100.0, 16);
obj.show_C();
return 0;
}
|
输出结果:
1
2
3
4
5
6
7
8
9
10
| 基类A被创建
直接派生类B被创建
间接派生类C被创建
id: 1
name: dwj
score: 100
age: 16
间接派生类C被销毁
直接派生类B被销毁
基类A被销毁
|
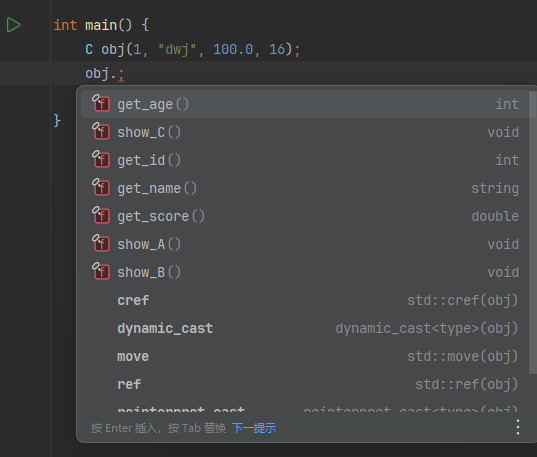
由于是公有继承,故在 C 类创建的对象中,可以调用父类的全部 public 以及 protected 方法,当然自己的什么都可以调用啦~

2.7 多重继承
也就是一个派生类继承了 ≥2 个基类
2.7.1 变量域覆盖
当前对象的成员如果与基类的成员重名或者函数重名并且参数列表完全一致,就会被当前的派生类完全覆盖,以下为变量名覆盖。
例如:
1
2
3
4
5
6
7
8
9
10
11
12
13
14
15
16
17
18
19
20
21
22
23
24
25
26
27
28
29
30
31
32
33
34
35
36
37
38
| #include <iostream>
#include <string>
using namespace std;
class A {
protected:
string name;
public:
A(string name) : name(name) {}
};
class B {
protected:
string name;
public:
B(string name) : name(name) {}
};
class C : public A, public B {
private:
string name;
public:
C(string nameA, string nameB, string nameC) : A(nameA), B(nameB), name(nameC) {}
void show() {
cout << "A的name: " << name << endl;
cout << "B的name: " << name << endl;
cout << "C的name: " << name << endl;
}
};
int main() {
C test("Tom", "Jerry", "John");
test.show();
return 0;
}
|
输出结果
1
2
3
| A的name: John
B的name: John
C的name: John
|
2.7.2 使用域作用运算符分辨成员
修改类 C 为:
1
2
3
4
5
6
7
8
9
10
11
| class C : public A, public B {
private:
string name;
public:
C(string nameA, string nameB, string nameC) : A(nameA), B(nameB), name(nameC) {}
void show() {
cout << "A的name: " << A::name << endl;
cout << "B的name: " << B::name << endl;
cout << "C的name: " << C::name << endl;
}
};
|
运行结果:
1
2
3
| A的name: Tom
B的name: Jerry
C的name: John
|
2.8 虚基类
书面定义:无论虚基类出现在继承层次的哪个位置上,他们都是 在非虚基类之前被构造。有虚基类的派生类的构造函数的调用次序是:编译器按照直接基类的声明次序,检查虚基类的出现情况,每个继承子树按照深度优先的顺序检查并调用虚基类的构造函数。虚基类多次出现只调用一次构造函数。虚基类的构造函数调用完之后,再按照声明的顺序调用非虚基类的构造函数。
总结一下就是两点:
- 按照声明顺序,深度优先搜索虚基类,后序构造
- 按照声明顺序,深度优先搜索非虚基类,后序构造
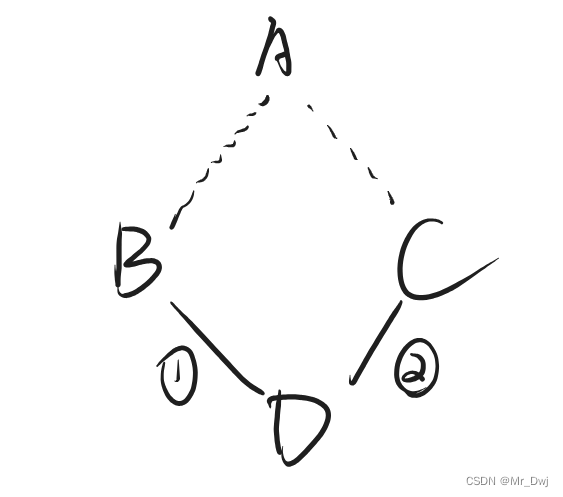
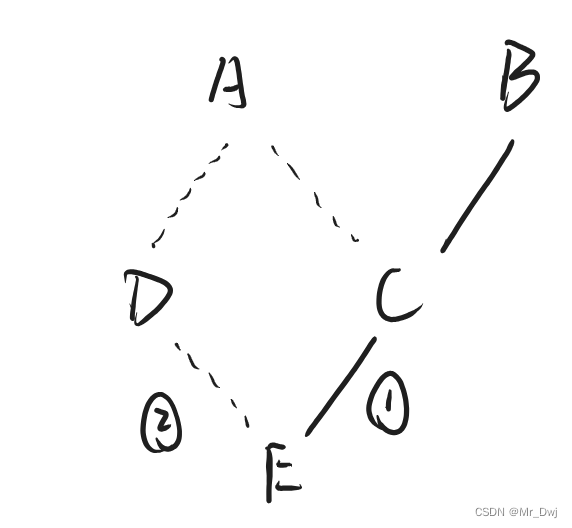
举三个例子就知道了(图中虚继承用虚线表示)
2.8.1 例一
1
2
3
4
| class A { };
class B : public virtual A { };
class C : public virtual A { };
class D : public B, public C { };
|

那么 D 对象创建时,构造函数的调用顺序是:A, B, C, D
2.8.2 例二
1
2
3
4
5
| class A { };
class B { };
class C : public B, public virtual A { };
class D : public virtual A { };
class E : public C, public virtual D { };
|

那么 E 对象创建时,构造函数的调用顺序是:A, D, B, C, E
2.8.3 例三
1
2
3
4
5
6
| class A {};
class B : public A {};
class C {};
class D {};
class E : public virtual D {};
class F : public B, public E, public virtual C {};
|

那么 F 对象创建时,构造函数的调用顺序是:D, C, A, B, E, F
2.9 基类和派生类的转换
对于一个派生类,在赋值 or 指针传递 or 引用传递给一个基类对象 or 基类指针 or 基类引用时,会失去派生类的另外加的成员变量,变成一个基类的对象。为了通过基类的指针,改变派生类的成员方法,引出了 C++中的一大特性:多态性。
3 多态
先补充一下函数调用绑定的知识点:分为静态绑定与动态绑定
3.1 虚函数
其实就是在父类中的函数声明最前面加上 virtual 关键词,从而在子类中可以重名改写这个函数,最后在相应的对象中通过指针或者引用调用响应对象的相同的函数,实现不同的自定义功能。
举个例子:
1
2
3
4
5
6
7
8
9
10
11
12
13
14
15
16
17
18
19
20
21
22
23
24
25
26
27
28
29
30
31
32
33
34
35
36
| #include <iostream>
using namespace std;
class A {
protected:
int a;
public:
A() { a = 0; }
virtual void Output() {
cout << "A: " << a << endl;
}
};
class B : public A {
private:
int b;
public:
B() : A() { b = 1; }
void Output() {
cout << "A: " << a << endl;
cout << "B: " << b << endl;
}
};
int main() {
A obj_A;
A* pA = &obj_A;
pA->Output();
B obj_B;
pA = &obj_B;
pA->Output();
return 0;
}
|
输出:

如果删除基类中的 virtual 关键字,则无法调用子类对象中的 Output 函数,只会输出这个:

并且会警告:

3.2 纯虚函数
其实就是提供一个 接口,只有函数声明,不写任何函数定义,从而实现了一个从基类定义的接口,供所有的子类进行函数的重写以及后续主函数中的调用(通过指针)。唯一的语法注意点就是在虚函数的后面加一个 = 0,如下是一个示例
1
2
3
4
5
6
7
| class A {
private:
public:
virtual void f() = 0;
virtual void g();
void h();
};
|
f() 是一个纯虚函数,用来做基类中的接口的g() 是一个虚函数,需要有自己的定义h() 是一个普通的基类中的成员函数,在其派生类中不可以进行重写
3.3 抽象类
包含纯虚函数的类就是一个抽象类;如果类中全是纯虚函数,则这个类就是纯抽象类。如下是一个纯抽象类:
1
2
3
4
5
6
7
| class A {
private:
public:
virtual void f() = 0;
virtual void g() = 0;
virtual void h() = 0;
};
|


